
The Crystal Ball
You can’t have it all
But a crystal ball
Shall reveal all
With no embroidered shawl
But fisheyes two
A Raspberry Pi three
Ultrasonic sensors four
And PIRs on each wall
A projector quite small
Processing then does it all
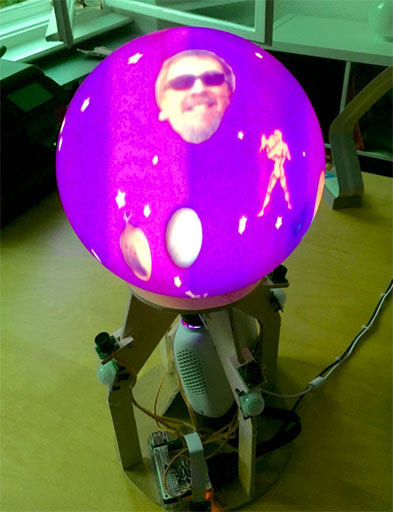
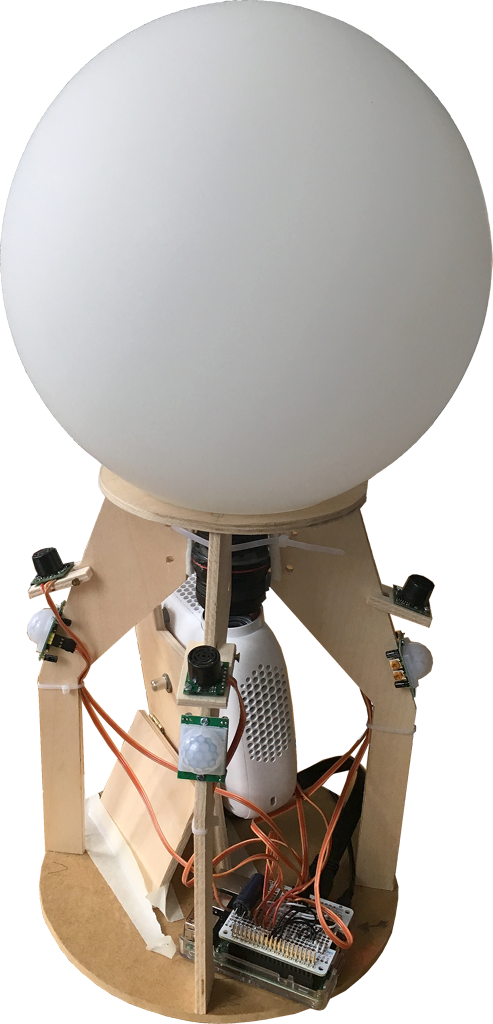
Only the initiated can see through this 21st century crystal ball. Approach it in the right frame of mind and your gestures will reveal all, even if you can only ever see half of the story. For the first time, its secrets are revealed here for all true believers.
The Raspberry Pi software
What does the Raspberry Pi software have to do?
- Boot Raspbian operating software from a 32 Gbyte plug-in MicroSD card
- Display the user interface image via an HDMI interface
- Support WiFi access
- Allow FTP access via WiFi to copy image files
- Allow VNC access via WiFi to allow a remote user interface
- Read out 4 ultrasonic sensors meant to detect hands
- Read out 4 passive infrared sensors meant to detect people
- Supply a sound signal via the HDMI interface
- Support the Processing software
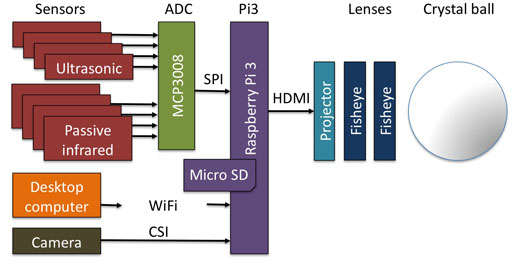
Block diagram
First steps
- Download the experimental image including Raspbian and Processing onto your desktop computer.
- Unpack the downloaded file (double-click on file).
- Copy the unpacked image onto a 32 Gbyte MicroSD card
- Put the MicroSD card into your Raspberry Pi3.
- Temporarily connect the Pi3 to any display with an HDMI interface
- Temporarily connect a keyboard & mouse to the Pi3 USB ports
(Once remote access is possible these temporary items won’t be needed.) - Power up the Pi3.
- Change the Raspbian preferences to match the keyboard connected under Menu->Preferences->Keyboard settings.
- From the Pi3 log in to the same WIFI network used by your desktop computer
- Install X11vnc on Raspbian. Using X11vnc means that you can directly view/control the same session as you see on the screen connected via HDMI.
- Download the Real VNC Viewer onto your desktop computer to access the Pi3 screen, keyboard & mouse remotely.
- Check that the iMac can access X11vnc properly e.g. use address 192.168.2.111
A fixed address would be good. How to set up a fixed IP address - Check that the your FTP client can access Pi3 with
IP address – e.g. 192.168.2.111
user – pi
password – raspberry
protocol – SFTP.
(SFTP is easier to setup than FTP as Raspbian has SSH enabled by default)
If your FTP client complains about change in the Pi’s key, delete the old entry for Raspberry Pi in ~/.ssh/known_hosts. - Remotely log in to Pi3 from Mac using VNC Viewer
- Configure X11VNC to start automatically (use nano not vim).
- Expand the Pi3 file system to use the full SD card capacity
Open a terminal window on the Pi3 and enter
sudo raspi-config
to open the Pi3 configuration and “Expand Filesystem” to ensure that all of the SD card is used. - Update Raspbian.
- Reboot the Pi3
- In a Pi3 terminal window enter
sudo raspi-config
and enable SPI to allow access to the 8 analogue inputs for the Pi - Update the Processing software in a Pi3 terminal window
curl https://processing.org/download/install-arm.sh | sudo sh - This loads the software to e.g.
/usr/local/lib/processing-3.2
The hardware
- Wire up the SPI bus to the MCP3008
- How to run a sketch without the editor
- https://github.com/processing/processing/wiki/Raspberry-Pi#video-library-capture
Help with Processing
Daniel Shiffmann has a Youtube channel called Coding Rainbow.
Abe Pazos has a great web site call Fun Programming.
Camera
https://github.com/processing/processing/wiki/Raspberry-Pi#video-library-capture
…
Problems
Raspberry Pi 2 software is not compatible with Raspberry Pi 3 software
- The OS Raspbian is different
- The Processing image is different
- Arduino has lots of support for sensors
- Raspberry Pi supports some sensors but they are not integrated into Processing
- Processing has a GPIO library but I haven’t found ready-made ultrasonic sensor support. I could use a serial interface but there’s only 1 on the Pi.
- Using a Raspberry Pi and an Arduino seems too much, but maybe it’s the path of least resistance.
Preparing Raspberry Pi 3 – OLD
- Download the experimental image including Raspbian and Processing that supports Raspberry Pi3 to iMac.
- Unpack the downloaded file (double-click on file).
- Copy the unpacked image onto a 32 Gbyte MicroSD card
- Put the MicroSD card into Pi3
- Connect Pi3 to TV with full HDMI interface
- Connect Pi3 to local WLAN
- Change Raspbian preferences for correct keyboard
- Open Epiphany web browser
- To configure Pi3 for 7 inch HDMI LCD panel (LCD won’t work otherwise)
Enter commandsudo su
Go to boot directory
cd ../../boot
Use the nano editor
nano config.txt
to add the following code to the end of /boot/config.txt:
max_usb_current=1
hdmi_group=2
hdmi_mode=1
hdmi_mode=87
hdmi_cvt 1024 600 60 6 0 0 0
- The laser projector doesn’t need that. The HDMI interface must either tell Pi3 what size the display is, or it must be configured. The 7″ LCD display doesn’t support this so either the projector must be connected first as it doe support that, or set the projector’s pixel size in config.txt.
- Install X11vnc on Raspbian
- Download Real VNC viewer onto iMac to access the Pi3 screen remotely.
- Check that the iMac can access X11vnc properly use address 192.168.2.111
Question. use fixed IP address? How to set up a fixed IP address - Check that the Viscom FTP client can access Pi3 with
IP address – 192.168.2.111
user – pi
password – raspberry
protocol – SFTP.
(SFTP is easier to setup than FTP as Raspbian has SSH enabled by default)
If FTP client complains about change in the Pi’s key, delete old entry for Raspberry Pi in ~/.ssh/known_hosts.
See if Pi speeds up when x11vnc disconnected
A/D converter
MCP3008 (datasheet)
Adafruit suggestion
Processing code suggestion
Enable the SPI interface in the P3 config.
Ultrasonic sensors
LV-MaxSonar EZ MB1010
www.maxboxit.com