

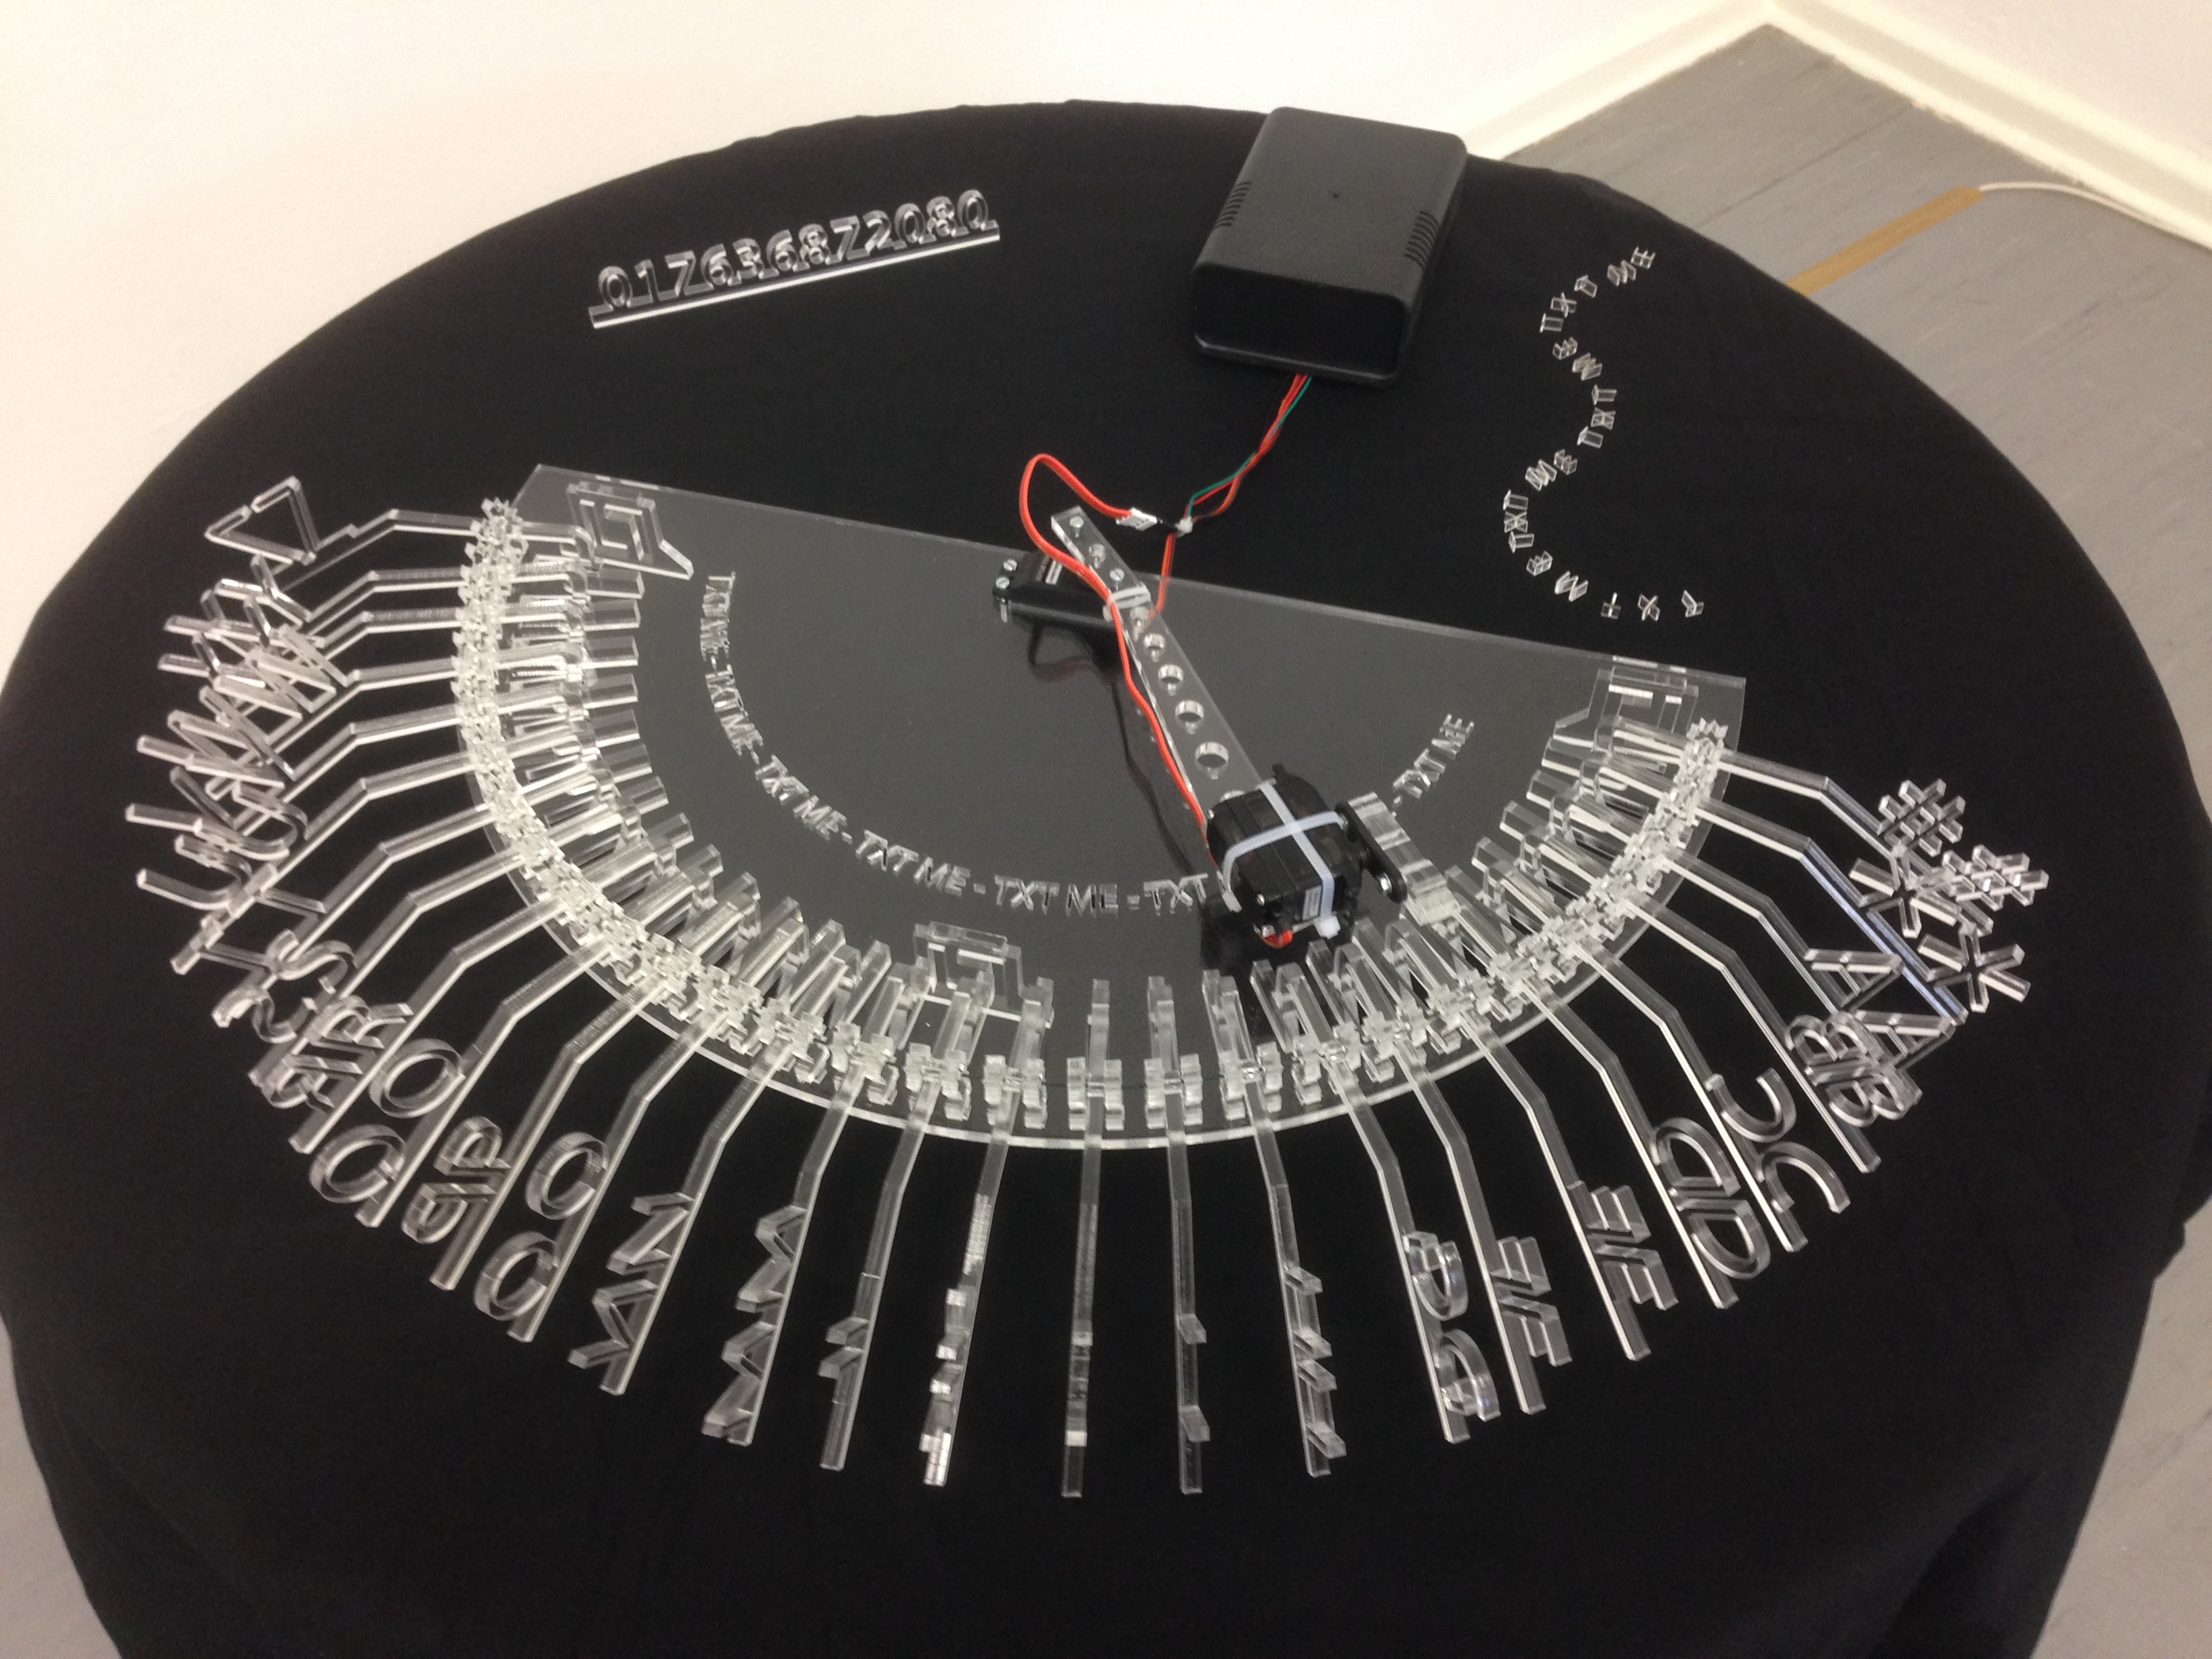
How does it work?
There is an Arduino Uno in the box, with a GSM shield. Most of the software was taken from the Arduino examples.How was it made?

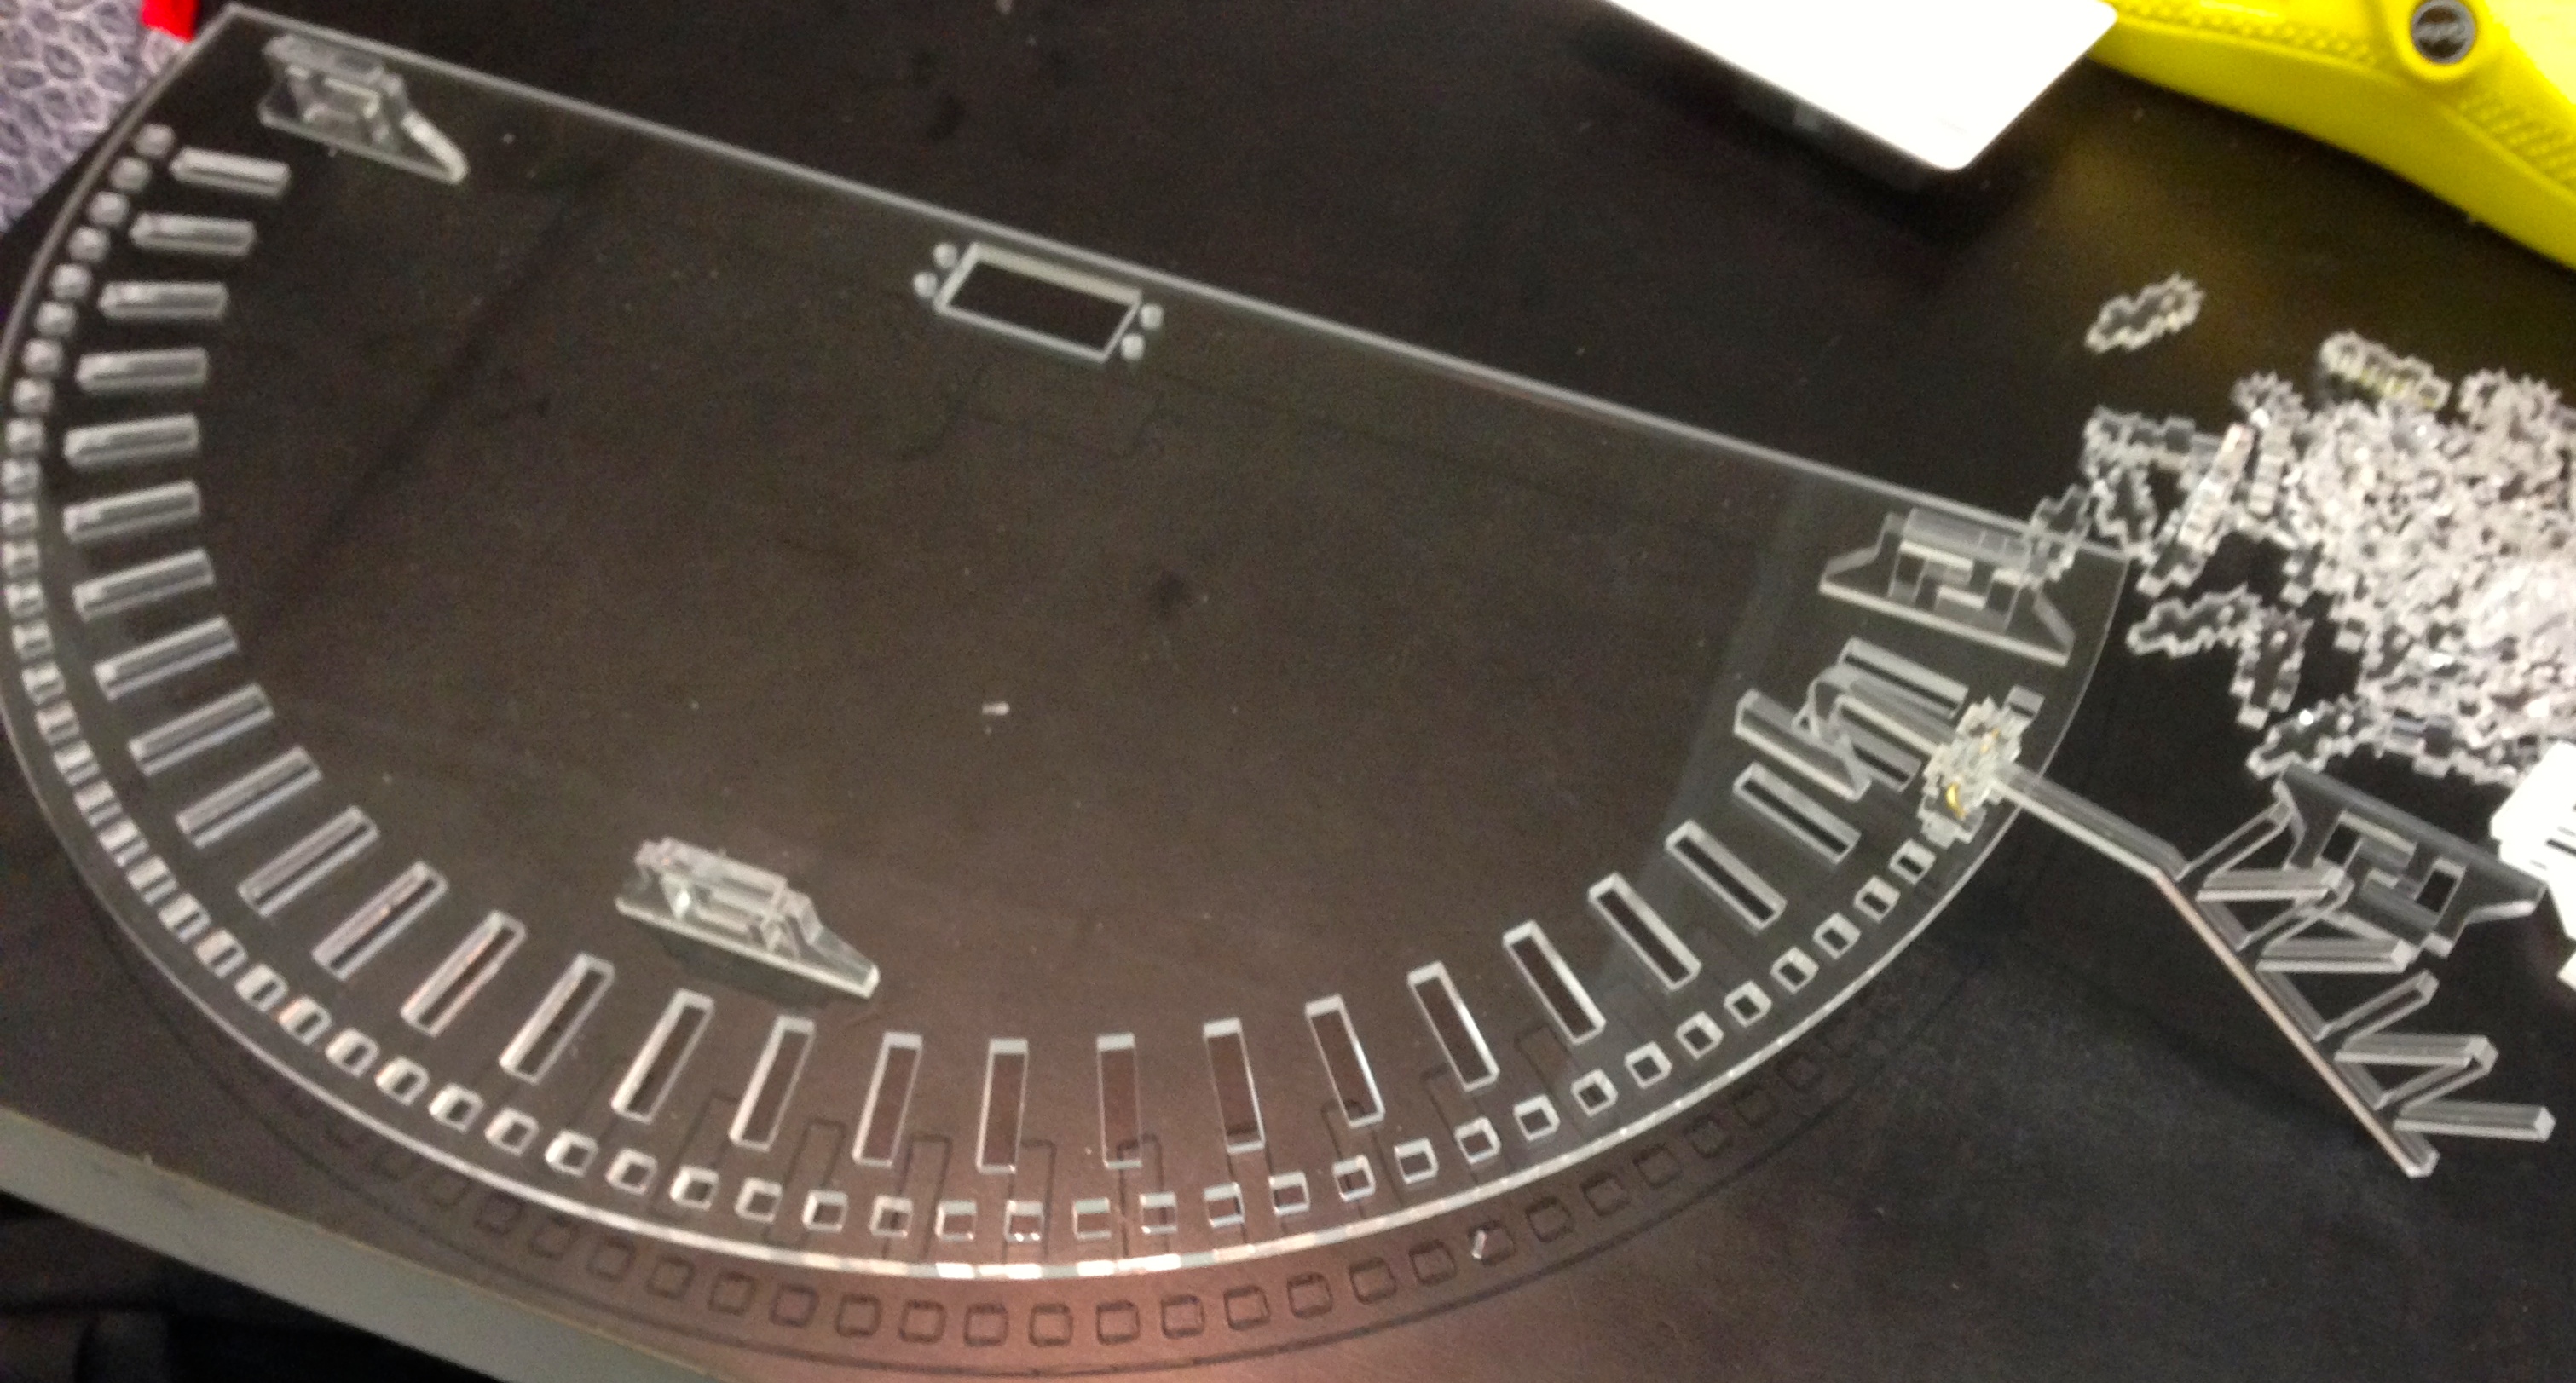
I drew the parts in Inkscape and went to the Fablab to cut 5 mm perspex using their 40 Watt Epilog Zing 6030 laser cutter.

What was difficult?
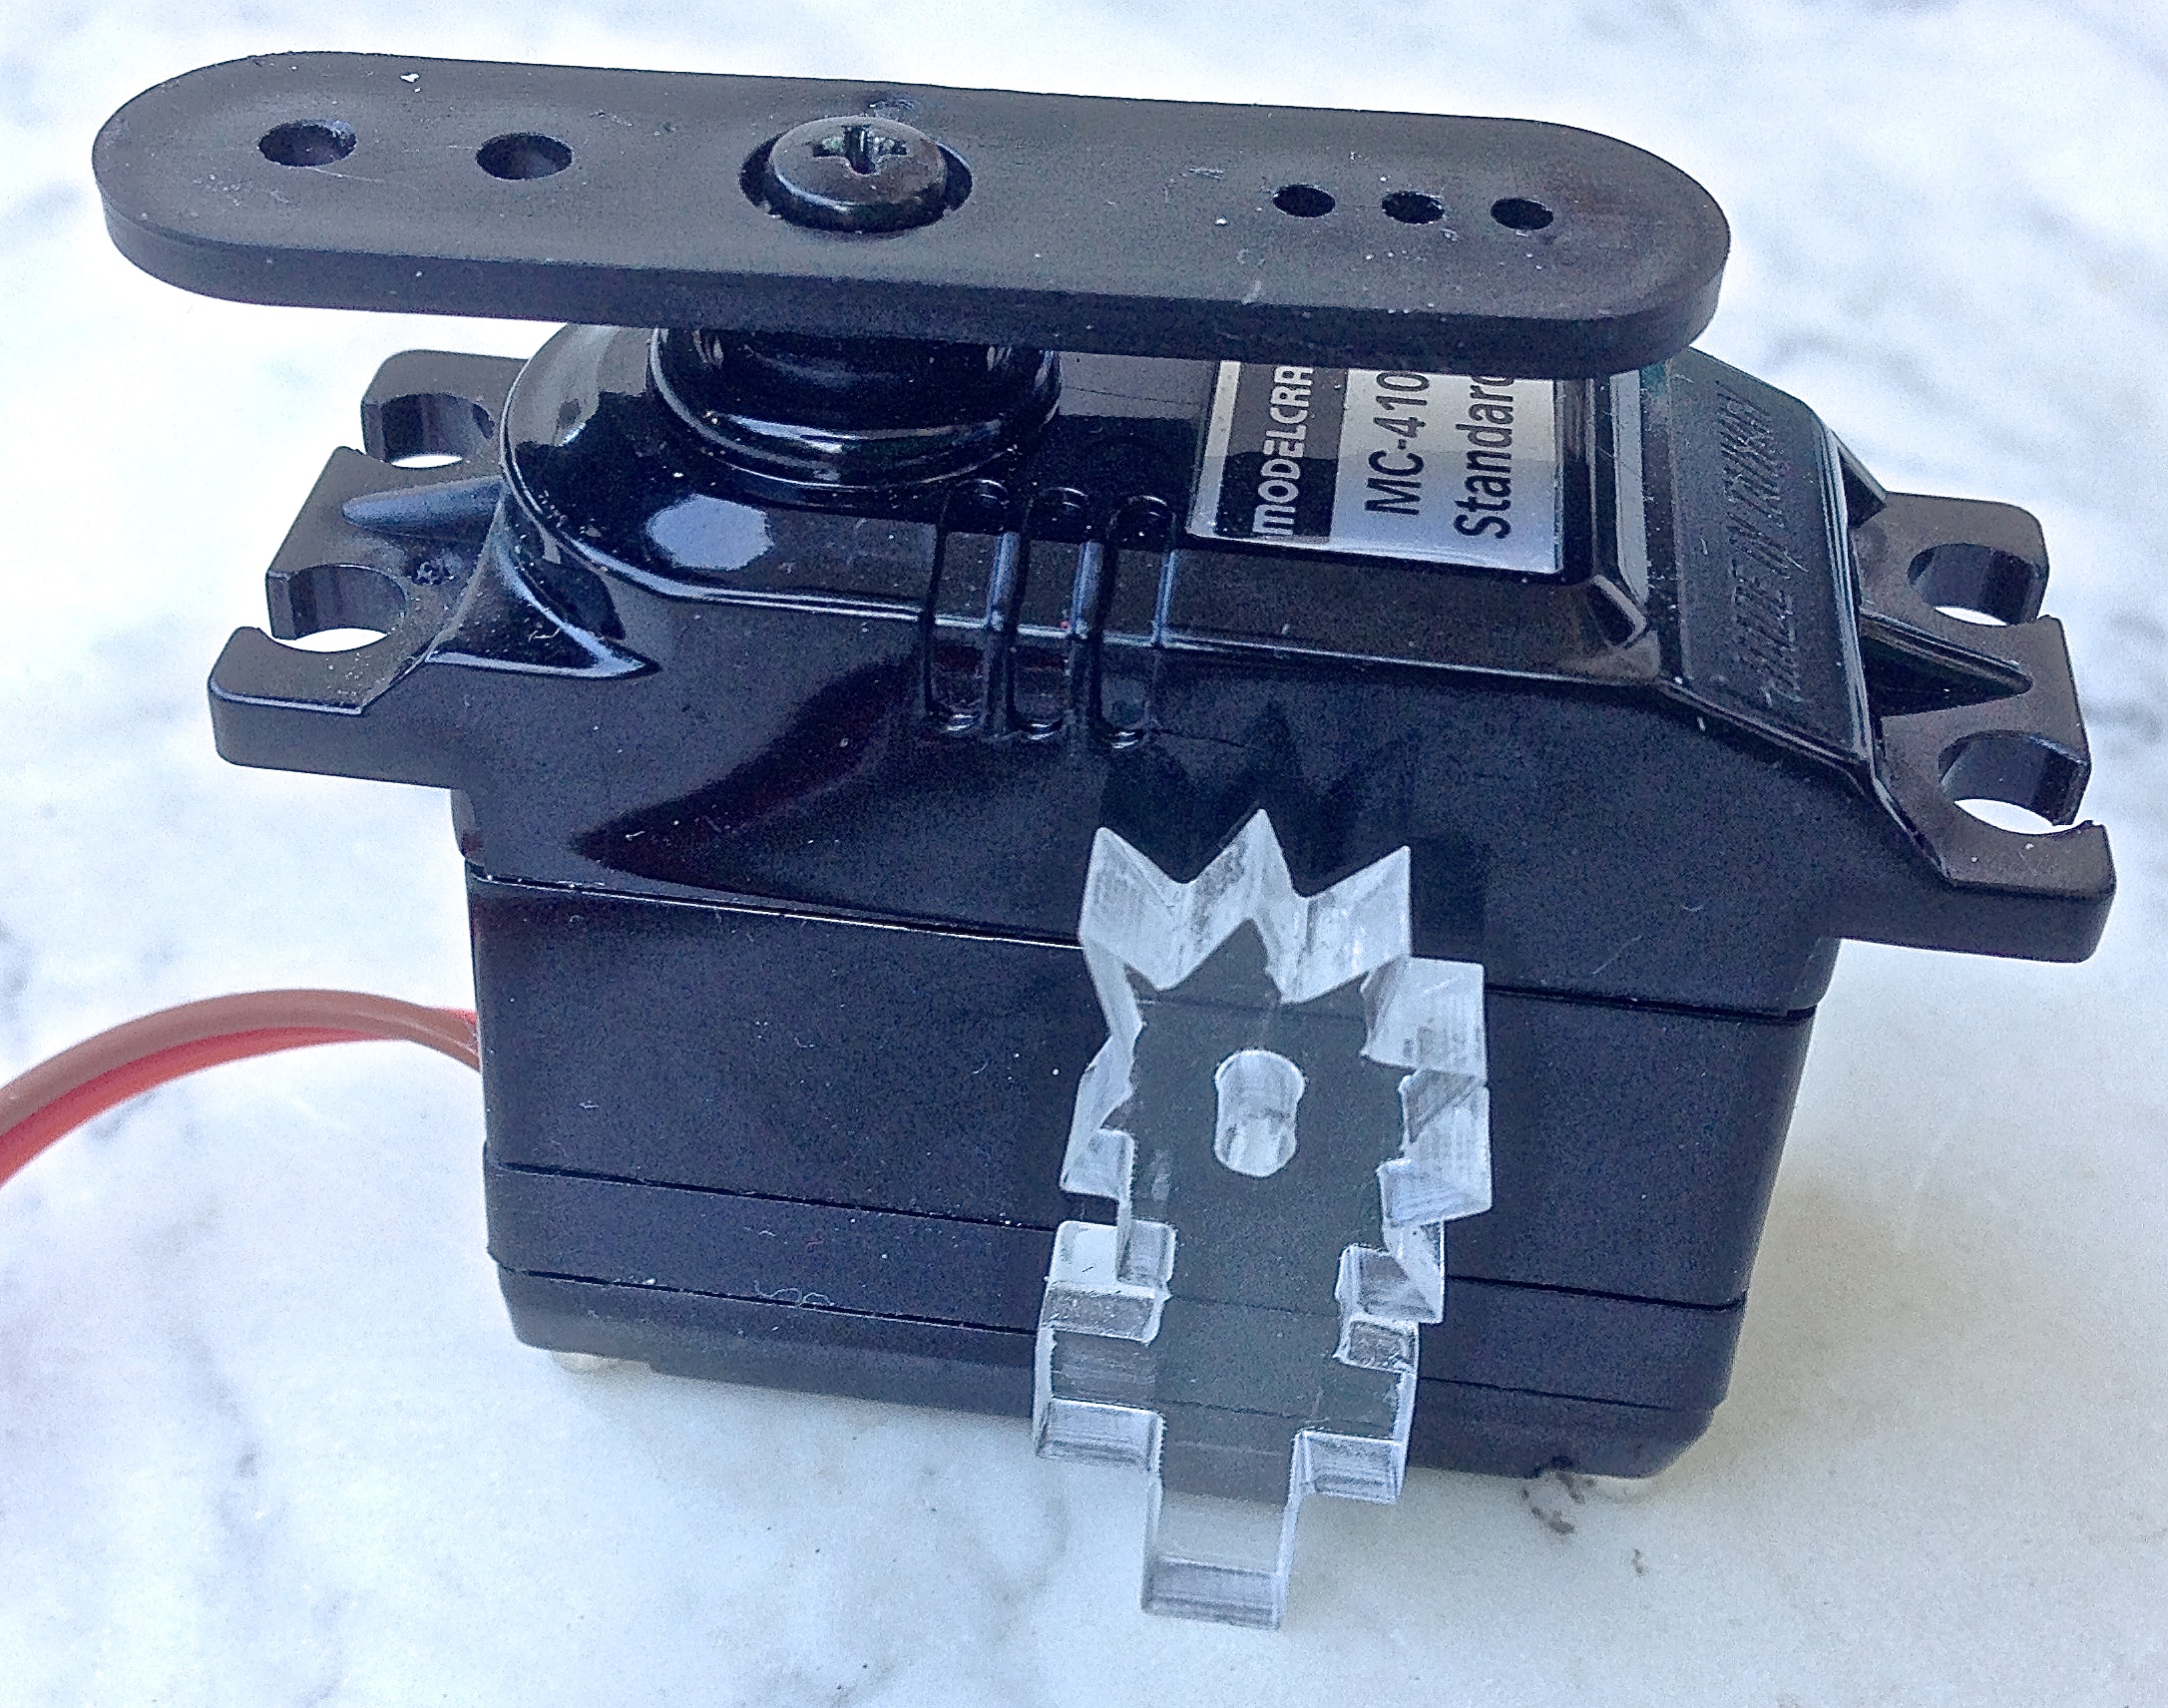 The servomotors were challenging. A 5 Euro servo with plastic gearing from Conrad liked to vibrate incredibly violently when the arm was connected to it and I tried to move it. A 20 Euro servo was stable but did not cover the range of angles that I needed. A 10 Euro servo was stable, but … over the course of a busy evening, the servo motor’s precision varied, so that it started missing the “A” arm completely. On the following morning, it was back to normal. I guess that even more money is required to get a servo which has the required precision, or maybe some external sensors could offer regular auto-calibration.
The Arduino was very sensitive to my soldering iron switching on and off as the iron controls its temperature. As I couldn’t do too much about that, once I had understood what was happening, I added a heartbeat LED which flashes for each pass through the main loop, to give me confidence that the Arduino was still running and not hung up, causing me to look for non-existent faults.
Showing it – What’s the response?

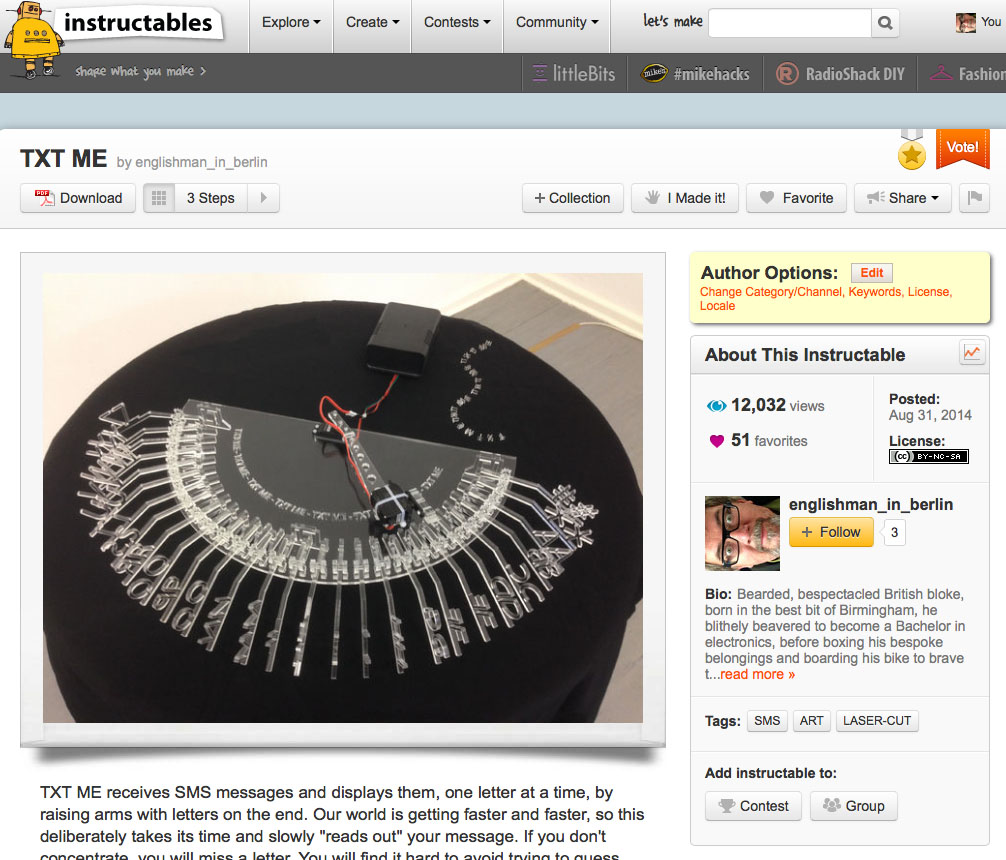
From the fantastic Instructables web site
stnfre001
It would be really cool to add a LED light to each letter, so that it lights up, when that letter is displayed.
KronoNaut
I adore this project.
askjerry
I tried to play the video… but it says “Error playing video, video could not be displayed.” Perhaps you can upload it to YouTube and post a link.
crispernakisan
This is pretty sweet. I like the design on the letters themselves, for sure. Yes, please do add a video… but with a short text for those of us with short attention spans. speaking of short attention spans, I’d probably need to add a “replay previous text” button.
crispernakisan
Oh… there is a video!
rimar2000
Very interesting. Maybe a video…
TheB1
Very creative. Though I can’t imagine what will happen the first time someone decides to text and drive with this device.
MsSweetSatisfaction
Definitely a different take on texting than anything else I’ve ever seen. Nice job, and thanks for sharing!
From Facebook
https://www.facebook.com/instructables
176 people like this.
Brandon Sims
Maybe a laser on the arm to illuminate the letter when it pops up.
Fernando Contreras
que hace
Corinne Whittington
COOL
Anthony Borrie
Cool
Put Likes First
We ought to try this stuffs
Crusieth Maximuss Whoa…
John Smith
Neat
On the first day
Hi englishman_in_berlin!Congratulations, your Step by Step Instructable “TXT ME” was just featured by one of our editors! Look for it in the Technology category. Being featured means we think you are awesome. Keep up the great work!
Hello englishman_in_berlin!
Your Step by Step Instructable “TXT ME” just became popular on Instructables!
Being popular means that tons of people are checking out your Step by Step Instructable and telling us they really like it. Keep up the great work!
Congratulations englishman_in_berlin!
“TXT ME” has been featured to the Instructables homepage! Being featured by our editors means your Instructable stands out and represents one of the best we have.
Projects like yours make Instructables a great place, and we really appreciate your time and effort. As a thank you, we’d like to give you a 3 Month Pro Membership to Instructables.
Thanks for being part of our community!
Instructables Team @ Autodesk | http://www.instructables.com/
Credits
How would I have done this without ?
Source code
Sorry, the spaces get zapped so this is a bit of a mess.
/*

 TEXT ME
 This sketch, relying on the Arduino GSM shield, waits for an SMS

 message and displays it through the serial port and on Kim's

 TEXT ME machine.
 Some code from Javier Zorzano / TD

 http://arduino.cc/en/Tutorial/GSMExamplesReceiveSMS
 */

 /******************************************************************************************

 *  T H E   C I R C U I T

 *

 *  An external power supply is mandatory, otherwise the GSM unit doesn't work

 *

 *  The GSM shield is plugged onto an Arduino Uno

 *  There are two servos both connected to GND and +5V

 *  The rotary servo control line goes to pin 5

 *  The vertical servo control line goes to pin 10

 *  The ready LED goes to pin 11 via a 200 ohm resistor

 *  The cathode of the ready LED goes to GND

 *

 ******************************************************************************************/

#include             // Include the GSM library

#include           // Include the servo library
#define PINNUMBER "XXXX"    // PIN number for the GSM SIM card - replace XXXX with actual value

#define rotaryPin 5         // Connect pin 5 to the rotary servo do not use 9 -unstable

#define verticalPin 10      // Connect pin 10 to the vertical servo

#define readyLed 11         // Connect pin 11 to LED which shows that GSM unit is connected
GSM gsmAccess;              // Initialise the library instances

GSM_SMS sms;

char senderNumber[20];      // Array to hold the number that an SMS is retrieved from

Servo rotaryServo;          // Create servo object to control rotary servo

Servo verticalServo;        // Create servo object to control vertical servo
// This is where the "calibrated" values are entered so that the rotary servo moves to the right place to find the letter concerned
int rotation [] = {

  161, 154, 148, 142, 136, 130, 124, 118, 112, 105, 99, 92, 85, 78, 72, 66, 60, 54, 48, 42, 36, 30, 24, 19, 12, 7};
int numberOfLetters = 26;

int currentServoPosition;

int newServoPosition;

int up = 170;                   // Two extremes of vertical servo

int down = 117;

int  inactivityTimer = 0;
/**************************************************************************************

 *    Set up

 **************************************************************************************/

void setup()

{

  Serial.begin (9600);                 // Initialise serial communication at 9600

  rotaryServo.attach (rotaryPin);      // Attach the rotary servo

  verticalServo.attach (verticalPin);  // Attach the finger servo
  boolean notConnected = true;   // GSM connection state

  parkArm();                     // Move to a safe space if not there already

  prompt();

  parkArm();                     // Move to a safe space
  while (notConnected)           // Wait until GSM connection is established

  {

    digitalWrite(readyLed, LOW); // Turn the ready LED off
    if (gsmAccess.begin (PINNUMBER) == GSM_READY)

      notConnected = false;

    else

    {

      Serial.println ("Not connected");

      delay (1000);

    }

  }
  Serial.println ("GSM initialized");        // Confidence building message

  Serial.println ("Waiting for messages");

  digitalWrite(readyLed, HIGH);              // Turn the ready LED on

}
/**************************************************************************************

 *    Main loop

 **************************************************************************************/

void loop()

{

  char c;
// If there are no SMSs available at regular intervals make a show
   inactivityTimer = inactivityTimer++;  // Count up for each loop

   if (inactivityTimer > 300)            // Approx. 1 sec per loop

   {

     inactivityTimer = 0;                // Reset the tomer

     prompt();                           // Draw attention to yourself

   }
// Heartbeat on LED to show that loop is still looping
     digitalWrite(readyLed, LOW); // Turn the ready LED off

     delay(100);                  // Time that LED is off

     digitalWrite(readyLed, HIGH); // Turn the ready LED on
 // If there is an SMS available
  if (sms.available())

  {

    inactivityTimer = 0; // If message then reset inactivity timer

    Serial.println("Message received from:");
// Read message bytes and print them

    while(c=sms.read())

    {

      raiseLetterArm (c);                     // "Print" to perspex arms

    }

    sms.flush();                              // Delete message from modem memory

  }
  delay(1000);
}
/**************************************************************************************

 *    Prompt any users

 **************************************************************************************/

void prompt()

{

       raiseLetterArm (84);       // "Print" TEXT ME to perspex arms

       raiseLetterArm (69);

       raiseLetterArm (88);

       raiseLetterArm (84);

       raiseLetterArm (77);

       raiseLetterArm (69);

}
/**************************************************************************************

 *    Put the arm out of harm's way

 **************************************************************************************/

void parkArm()

{

      rotaryServo.attach (rotaryPin);   // Attach the rotary servo

      newServoPosition = 180;           // Park where the arm can do no harm when switched on/off

      currentServoPosition = 9;         // Make sure that it is clear that a move is needed

      rotateServo();                    // Move the rotary servo

      delay(2000);                      // Wait for the servo to get there

      rotaryServo.detach ();            // Keep things quiet

}
/**************************************************************************************

 *    Raise the letter arm specified

 **************************************************************************************/

void raiseLetterArm (int charEntered)

{

  rotaryServo.attach (rotaryPin);       // Attach the servo on pin
  // 'A' is 65 'a' is 97 'Z' is 90

  if ((charEntered < 65) || ((charEntered > 91) && (charEntered < 97))
    || (charEntered > 123))

  {

    // Then is not A to Z so do nothing - wait a bit

  }

  else

  {

    // Make lower case into upper case

    if (charEntered > 96)

    {

      charEntered = charEntered - 32;

    }

    if ((charEntered > 64)&&(charEntered < 91))
    {
      newServoPosition = rotation [charEntered - 65];  // Set where to turn the arm to
      rotateServo();
    }
    // Show what was sent:
    Serial.print("You sent me: \'");
    Serial.write(charEntered);
    Serial.print("\'  ASCII Value: ");
    Serial.println(charEntered);
    pressDown ();
  }
 rotaryServo.detach ();       // Stop random movements
}


/*********************************************************************************
 *   Push the finger down - make sure it is up before returning !
 *********************************************************************************/
void pressDown()
{
  verticalServo.attach (verticalPin);  // Attach the finger servo
  delay(500);
  for (int i= 0; i < up-down; i++)
  {
    verticalServo.write (up-i); // Finger down one degree at a time
    delay(10);
  }
  delay(2000);
  for (int i= 0; i < up-down; i++)
  {
    verticalServo.write (down +i); // Finger up one degree at a time
    delay(10);
  }
  delay(500);
  verticalServo.detach ();     // Stop random movements
 }


/*********************************************************************************
 *   Move the arm around - make sure that the finger is up before using it
 *********************************************************************************/
void rotateServo()
{
  int difference;
  int noOfSlowSteps = 5;                // No of degrees to move slowly was 5
  int waitForServo = 20;                // Do not reduce too much or it misses steps

   verticalServo.attach (verticalPin);  // Attach the finger servo
   verticalServo.write (up);            // Make sure it's out of the way
   verticalServo.detach ();             // Detach

  difference = newServoPosition - currentServoPosition;
  if (difference > noOfSlowSteps)

  {

    rotaryServo.write (newServoPosition - noOfSlowSteps);    // Quickly move

    currentServoPosition = newServoPosition - noOfSlowSteps; // Note new position

  }

  if (difference < -1*noOfSlowSteps)
  {
    rotaryServo.write (newServoPosition + noOfSlowSteps);    // Quickly move
    currentServoPosition = newServoPosition + noOfSlowSteps; // Note new position
  }
  difference = newServoPosition - currentServoPosition;      // Recalculate difference

  if (difference > 0)

    // Then slowly increase current position until difference is 0

  {

    for (int i = 0; i < difference+1; i++)
    {
      rotaryServo.write (currentServoPosition + i);
      delay (waitForServo);
    }
  }
  else
    // Then slowly decrease current position until difference is 0
  {
    for (int i = 0; i < (-1*difference)+1; i++)
    {
      rotaryServo.write (currentServoPosition - i);
      delay (waitForServo);
    }
  }
  currentServoPosition = newServoPosition;  // Remember where arm is
}


/**********************************************************************************
 *  windscreen wiper test
 **********************************************************************************/
/*    for (letter=0; letter < numberOfLetters; letter++)
 {
 newServoPosition = rotation [letter];  // Set where to turn the arm to
 rotateServo();
 //    Serial.print("rotation [letter] ");
 //  Serial.println(rotation [letter]);
 }
 delay(5000);
 for (letter=numberOfLetters; letter +1 > 0; letter--)

 {

 newServoPosition = rotation [letter];  // Set where to turn the arm to

 rotateServo();
 //    Serial.print("rotation [letter] ");

 //  Serial.println(rotation [letter]);

 }

 delay(5000); */
/**********************************************************************************

 *  To calibrate the rotary servo

 **********************************************************************************/

 /* - commented out, define potpin and uncomment to use

val = analogRead(potpin);            // Reads the value of a potentiometer connected between +5 and GND on potpin (value between 0 and 1023)

 val = map(val, 0, 1023, 0, 179);     // Scale it to use it with the servo (value between 0 and 180)

 rotaryServo.write(val);              // Sets the servo position according to the scaled value

 delay(15);                           // Waits for the servo to get there

 // print out the value you read:

 Serial.println(val); */